Implementing Webfonts with local fallback 1
In these articles I propose a methodology to implement web fonts, in this case from Google Web fonts service, with local fallback. Benefits from this methodology:
- You can use the CDN from Google and therefor reduce the loading time of your site in case the user has already cached the font.
- You can be quiet in case that Google ever removes the service or in the improbable case it would ever be down.
- You can reliably develop in off-line modus.
Specifically in this first article, I’ll go through the first steps until the font files are ready.
0. Understanding the method
The method proposed here uses a couple of techniques to ensure that the fonts can be used first from the external server and then from the local server if the first option fails:
- Google fonts will be loaded via JS to be able to track whether the fonts were loaded or not.
- Google fonts uses the style-linking to serve the font styles. So we will use name-matching method to serve our font styles. Both together are the combined method, which you can find perfectly explained in SmashingMagazine:
Franz, Laura. “Setting Weights And Styles With The @font-face Declaration”. SmashingMagazine. February 14th, 2013. August 30th, 2013. http://coding.smashingmagazine.com/2013/02/14/setting-weights-and-styles-at-font-face-declaration/
1. Choosing Fonts
First of all, of course, you should choose one or more fonts and font styles. Since we are using both style-linking and name linking we can take advantage from the benefits from both techniques, but we’ll also have to manage drawbacks from both techniques.
Drawback: Using style-linking, which is the technique used by Google on the font-styles they serve means that the number of fonts (font names) and styles (light, bold, italic and combinations) is limited due to… wait for it… Microsoft Internet Explorer! You can read more about this in the article from Smashing Magazine from above: Setting Weights And Styles With The @font-face Declaration. Then search inside the sub-title “Problem: Internet Explorer 7 and 8 can only apply up to four weights and styles to a single font-family name”.
For this article I’ll use the fonts used in this page (note that from each family Google offers more derivatives):
- Source Sans Pro:
- Light 300
- Light 300 italic
- Semi-Bold 600
- Semi-bold 600 italic
- Roboto Slab
- Light 300
2. Getting the fonts ready
The first step, after choosing your font family and its derivatives, is to get all the font formats for each browser. Google is doing this for you behind the scenes and serves only the appropriate file format to each browser via server-side detection.
To do so click on the arrow icon on the upper right corner to download the fonts in True Type Format (*.ttf):
![]()
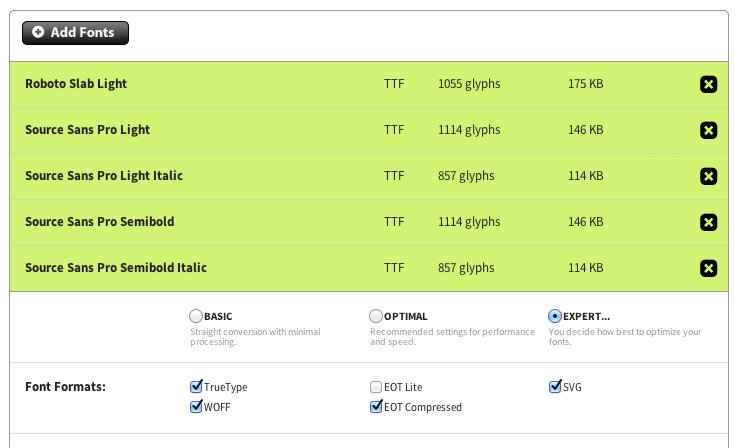
Pay attention: when you download the chosen fonts you’ll get the whole family for each font, while you’ll probably want only some of them. On our example I just want the 5 described above, out of the 16 downloaded.
Then head over to FontSquirrel to transform your ttf font files to the rest of the formats:
- Upload only the ttf files that respond to the chosen fonts (max. 3 uploads at the same time)
- Choose the “Expert” option to optimize the fonts
- Formats: TrueType, WOFF, EOT Compressed, SVG
- Truetype Hinting: Keep existing
- CSS: make sure “Style linking” is not active
- Check the Agreement
- Click on “Download your kit”
You’ll see at the top of the table the conversion progress for each font you uploaded before getting a zip file with all the necessary files.
Now unzip the downloaded file and place the font files (only the *.ttf, *.eot, *.woff and *.svg files) in a folder from your project, in my case I placed them in “/assets/vendor/googleFonts/”, keeping there a separate folder for each font family.
Place also the “stylesheet.css” file in a folder from your project. This file contains the @font-face declarations and will be used when the fallback is activated. Remember to update the path to the fonts in this file. This path is relative to this file, not to the HTML document. In my case I placed it in “/assets/vendor/googleFonts/_fonts.css” (I’ve renamed it), so the URL to each font will have to contain only the folder name: src: url('robotoSlab/robotoslab-light-webfont.eot?#iefix') format('embedded-opentype'),.
Lastly, in order to properly apply the combined method we need to update the @font-face declarations, by giving to each declaration its appropriate font-weight and font-style. For instance:
1 2 3 4 5 6 7 8 9 10 | @font-face { font-family: 'source_sans_proSBdIt'; src: url('sourceSansPro/sourcesanspro-semibolditalic-webfont.eot'); src: url('sourceSansPro/sourcesanspro-semibolditalic-webfont.eot?#iefix') format('embedded-opentype'), url('sourceSansPro/sourcesanspro-semibolditalic-webfont.woff') format('woff'), url('sourceSansPro/sourcesanspro-semibolditalic-webfont.ttf') format('truetype'), url('sourceSansPro/sourcesanspro-semibolditalic-webfont.svg#source_sans_proSBdIt') format('svg'); font-weight: normal; font-style: normal; } |
should become:
1 2 3 4 5 6 7 8 9 10 | @font-face { font-family: 'source_sans_proSBdIt'; src: url('sourceSansPro/sourcesanspro-semibolditalic-webfont.eot'); src: url('sourceSansPro/sourcesanspro-semibolditalic-webfont.eot?#iefix') format('embedded-opentype'), url('sourceSansPro/sourcesanspro-semibolditalic-webfont.woff') format('woff'), url('sourceSansPro/sourcesanspro-semibolditalic-webfont.ttf') format('truetype'), url('sourceSansPro/sourcesanspro-semibolditalic-webfont.svg#source_sans_proSBdIt') format('svg'); font-weight: 600; font-style: italic; } |